New Kitchen Faucet Installation – Real Job in a Las Vegas Kitchen
A kitchen faucet works harder than almost any other fixture in your home. It runs all day for cooking, cleaning, rinsing, and filling pots. Over time, the faucet starts to leak, lose pressure, or just look worn out. That’s when a new kitchen faucet installation can make a huge difference in both function and style.
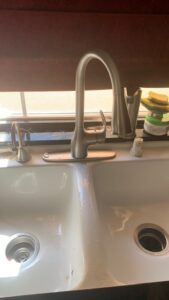
This blog walks through a real project we completed in a Las Vegas kitchen (like the one in the photo above) and explains what homeowners should know before replacing their faucet.
Why This Las Vegas Kitchen Needed a New Faucet
In this home, the existing kitchen faucet was:
-
Dripping around the base
-
Stiff to move left and right
-
Starting to show finish wear and hard-water marks
The homeowner wanted a modern pull-down faucet to match their stainless-steel double-bowl sink and to make everyday use easier. They bought a new faucet and called us to handle the installation, shut-offs, and leak testing so they wouldn’t have to crawl under the sink and fight with old connections.
Step 1: Inspecting Under the Sink
Before any tools come out, we start by looking under the sink:
-
Condition of the shut-off valves
-
Type and size of supply lines
-
Space available around the garbage disposal and drain pipes
-
Any signs of old leaks or water damage in the cabinet
This step is important. Old or frozen shut-off valves can break when you turn them, which is why a quick inspection protects the home before we ever loosen a fitting.
Step 2: Removing the Old Kitchen Faucet
Next, we carefully remove the existing faucet:
-
Turn off hot and cold water at the valves
-
Disconnect the supply lines and sprayer hose
-
Loosen the mounting nuts that hold the faucet to the sink
-
Remove any deck plate or escutcheon covering extra holes
In many older kitchens, these parts are rusty or corroded. Using the right tools and technique prevents damage to the sink or countertop while everything is being removed.
Step 3: Cleaning and Preparing the Sink Area
With the old faucet out, we clean up:
-
Old plumber’s putty or silicone around the base
-
Mineral buildup on the stainless-steel sink
-
Any standing water in the cabinet
This is also when we confirm that the number of holes in the sink matches the new faucet. On this job, the stainless-steel double-bowl sink had a standard layout, so the new pull-down faucet and side accessory lined up perfectly.
Step 4: Installing the New Kitchen Faucet
Now the fun part—installing the new faucet.
For this project, we:
-
Set the gasket or putty base as required by the manufacturer
-
Inserted the faucet body through the mounting hole
-
Tightened the mounting hardware from underneath so the faucet sits solid and doesn’t wobble
-
Connected hot and cold supply lines to the shut-off valves
-
Hooked up the pull-down hose and weight so the sprayer retracts smoothly
Because the sink is directly under a window, we also made sure the new faucet height worked with the window ledge and didn’t interfere with opening and closing.
Step 5: Testing for Leaks and Proper Operation
Before we call any kitchen job finished, we always test:
-
Turn on the shut-off valves slowly and check every connection
-
Run hot and cold water separately
-
Test the pull-down sprayer and spray patterns
-
Check under the sink again after a few minutes to make sure there are no slow drips
In the photo, you can see the finished faucet sitting cleanly on the double-bowl sink, with the cabinet doors open below. That’s because we always inspect the cabinet one more time after everything is pressurized.
Common Issues We Find During Kitchen Faucet Installs
Every house is different, but there are a few problems we see often in Las Vegas:
-
Shut-off valves that don’t turn or leak around the stem
-
Old plastic supply lines that are brittle or cracked
-
Tiny pinhole leaks that only show after several minutes of running water
-
DIY repairs from past owners that were never done correctly
If we find any of these, we let the homeowner know and offer to correct them while we’re already on site. That way the new faucet isn’t connected to old, failing parts.
DIY vs Hiring a Pro for Faucet Replacement
Yes, a handy homeowner can sometimes install a faucet themselves. But there are a few reasons many clients prefer to call a professional:
-
No time spent crawling under the sink
-
No guessing which adapter or supply line is needed
-
Lower risk of leaks that damage the cabinet and flooring
-
Proper installation for touchless and high-end faucets
-
A clean, professional finish that looks as good as it works
For rental properties, Airbnb units, or homes getting ready to sell, the cost of a professional faucet installation is tiny compared to the cost of one hidden leak.
Planning Your Own New Kitchen Faucet Installation
If you’re thinking about replacing your kitchen faucet, here are some quick tips:
-
Take a clear photo of your sink and faucet (like the one above)
-
Count how many holes the sink or countertop has
-
Measure the height and distance to any window ledge or cabinets
-
Decide if you want a pull-down spray, touchless feature, or basic model
-
Keep the box, instructions, and all parts together for your installer
Once you’ve got that ready, scheduling the job is easy.
Need a New Kitchen Faucet Installed in Las Vegas?
If your kitchen faucet is dripping, loose, or just outdated, we can help.
Call 4 Handyman Las Vegas provides professional kitchen faucet installation and replacement in:
-
Las Vegas
-
Henderson
-
North Las Vegas
-
Boulder City
📞 Call or text: 702-752-0758 to schedule your faucet installation,
or request service through our online contact form.
A new faucet can make your whole kitchen feel cleaner, newer, and easier to use—especially when it’s installed right the first time.